This post is a just a quick walkthrough of how to build the Linux kernel and run it on VirtualBox, instead of your own machine. This is useful for any development in the kernel you might do that is purely software related, and doesn’t require direct access to any hardware (though you can give VirtualBox direct access to a USB device).
The benefits of installing a custom kernel on a VM are manifold. The most compelling, in my opinion, is that you don’t have to worry about messing up your system, so you have freedom to really experiment.
-
Go ahead and download and install VirtualBox.
-
Next, we need to clone the Linux repository. Open a terminal tab and run:
git clone git://git.kernel.org/pub/scm/linux/kernel/git/stable/linux-stable.gitThis will take a while (it is gigabytes large), and we have other stuff to do.
-
Go ahead and download the boot ISO for your favorite distro (the instructions will assume the distro you are currently running, but that doesn’t have to be the case). Make sure that the distro you want to use can work with the version of Linux that you want to build and install.
-
Next open up VirtualBox and create a new virtual machine. When you come to the option about disks make sure to choose “Create a virtual hard disk now”. Make sure to choose the “VDI” format rather than “VHD” or “VMDK”. Depending on what your’re doing and what your distro expects you might have to allocate more or less space for the virtual disk, and if disk performance isn’t a concern you can choose “Dynamically Allocated” rather than “Fixed Size” for how to store it on your machine. Make note of where the vdi file is saved. Also, make sure to size the volume decently large (say at least 15GB), the unmodified install commands we will be running require a lot of space.
-
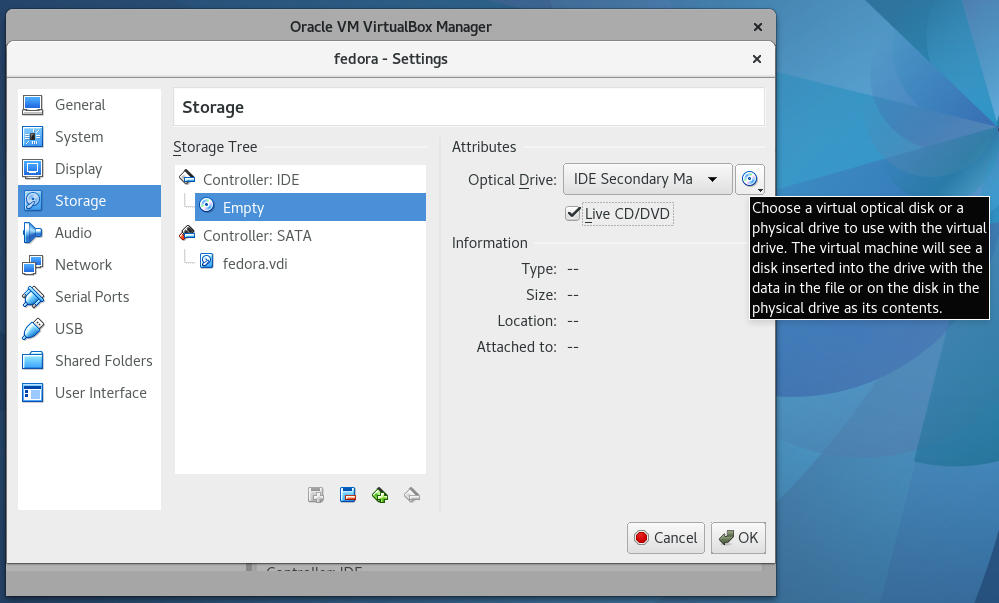
Click on the “Settings” button for your new virtual machine and then the “Storage” setting. Click on the CD-looking icon and choose “Live CD/DVD” then choose your distro ISO from the other CD-looking icon next to the “Optical Drive” dropdown.
-
Start the virtual machine and install the distro.
-
Once the distro is installed shutdown the VM, remove the Live CD/DVD and start the VM up again to make sure the distro is installed.
-
Make sure you qemu-nbd installed:
lsmod | grep nbdIf not run:
sudo modprobe nbd max_part=8 -
Next create a device from the vdi file:
sudo qemu-nbd -c /dev/nbd1 /home/$YOUR_USER/VirtualBox\ VMs/$YOUR_DISTRO/$YOUR_DISTRO.vdi -
Sometimes the partitions won’t show up. If that happens run:
sudo partprobe /dev/nbd1 -
Mount the boot and rootpartition:
sudo mount /dev/nbd1p1 /mnt # assuming this is root sudo mount /dev/nbd1p2 /mnt/boot # assuming this is boot -
cdinto the linux-stable git folder when it’s fully downloaded. Copy your current distro’s config (or generate one in another way). Build the kernel.cd /home/$YOUR_USER/Development/linux-stable cp /boot/config-`uname -r`* .config make # this will take a whileNote: you can speed the build process by running:
make -jX # X is the number of cores you want to dedicate to the build process; this will slow your system -
Install the modules and kernel into the nbd mount.
sudo make INSTALL_MOD_PATH=/mnt/lib/modules/`uname -r` modules_install sudo make INSTALL_PATH=/mnt/boot install -
Unmount the nbd paritions and remove the nbd device:
sudo umount /mnt/boot sudo umount /mnt sudo qemu-nbd -d /deb/nbd1 -
Start up you virtual machine, remove the old ramdisk, create a new one, and update grub.
sudo rm /boot/initramfs-`uname -r`.img sudo update-initramfs -c -k $VERSION_OF_LINUX_YOU_BUILT # make sure this looks like what uname -r would output sudo update-grub -
Restart your virtual machine, and you should now see your custom linux build.